


.png)
.png)
.png)
.png)
.png)
.png)


May 25, 2026

Read Time
5
Sewer Surgeons’ Process: What Our On-site Pipe Relining Includes Step by Step
You've got a damaged pipe somewhere on your property. Maybe it's tree roots breaking through. Maybe it's decades-old earthenware that's finally given up. Either way, you're looking at pipe relining as the fix, and you want to know what actually happens when we turn up.
Pipe relining isn't something most property owners see every day. The process can sound mysterious if you've only heard the basics. Here's the full picture of what we do at Sewer Surgeon when we arrive for pipe relining in Sydney, from the first inspection to the final check.
Initial Site Assessment and CCTV Pipe Inspection
Before we touch a single tool, we need to see what's going on inside your pipes. That means a CCTV camera inspection, which is non-negotiable for relining work.
We insert a high-resolution camera attached to a flexible cable into your drain or sewer line. The camera travels through the pipe, sending live footage back to our screen. We're looking for cracks, breaks, root intrusion, collapsed sections, or corrosion. We also check the pipe diameter, material, and overall condition of surrounding sections.
This inspection usually takes 30 to 60 minutes depending on how long the pipe is. We record the footage so you have visual proof of what's wrong. This helps when you're making decisions about repairs or dealing with insurance claims.
Once we've got the inspection footage, we'll talk you through what we found. We'll point out the damaged sections on the screen and explain whether relining is the right fix or if there are other issues to address first.
Cleaning and Preparation of the Pipe
Relining only works if the inside of the pipe is clean. Really clean. Any debris, tree roots, grease buildup, or scale will prevent the resin liner from bonding properly to the pipe wall.
We clean the pipe using high-pressure water jetting. We're talking about water blasted through the pipe at pressures up to 5,000 psi. The jetting equipment uses specialised nozzles that break up blockages, scrape away buildup, and cut through tree roots that have pushed into the line.
If there are stubborn roots or hard scale, we might use a mechanical cutter or grinding head to remove them before the water jetting. The goal is a pipe interior that's smooth and clear, with no obstructions.
After cleaning, we run the CCTV camera through again to confirm the pipe is ready. This second inspection also lets us double-check measurements and make sure we haven't missed anything.
Measuring and Preparing the Resin Liner
Once the pipe is clean and ready, we move on to the liner itself. This is the core of the relining process.
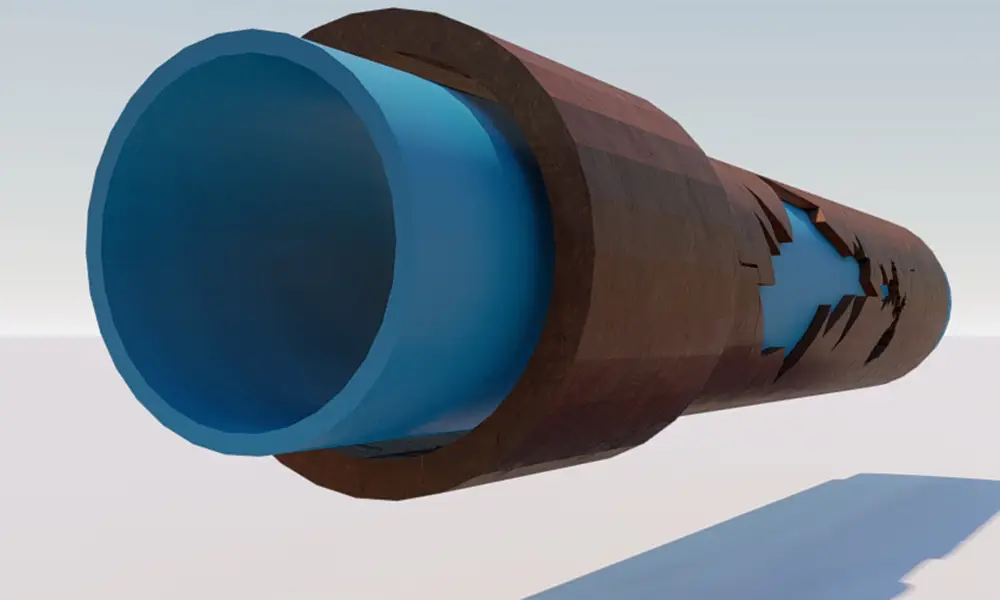
The liner is a flexible tube made from felt or fibreglass that's been saturated with epoxy resin. We measure it to match the length of the damaged section, with a bit of extra length on each end. The diameter of the liner is sized to fit snugly inside your existing pipe without reducing flow capacity.
We prepare the liner on-site. The resin we use is a two-part epoxy system that starts curing once mixed, so timing matters. We mix the resin components, saturate the liner thoroughly, and then seal it inside a protective sleeve until we're ready to insert it.
The resin needs to be at the right temperature and consistency before we install it. Too cold and it won't cure properly. Too warm and it starts curing before we've positioned it. We monitor all of this closely because the quality of the finished repair depends on getting these details right.
Inserting the Liner Into the Pipe
With the liner prepped, we insert it into the pipe. There are two main methods, and which one we use depends on the situation.
The first method is inversion. We use air pressure to turn the liner inside out as it travels through the pipe, pushing it into position from the entry point. This works well for longer runs and pipes with bends or curves.
The second method is pull-in-place. We attach the liner to a cable or winch and pull it through the pipe to the damaged section. This method gives us more control over placement and works better for shorter sections or pipes with difficult access points.
Whichever method we use, the goal is the same. Get the liner positioned exactly where it needs to be, covering the entire damaged section with no gaps or folds. We monitor the insertion using the CCTV camera to make sure everything is lining up correctly.
Once the liner is in position, we inflate it using air or water pressure. This presses the liner firmly against the inside wall of the existing pipe, ensuring full contact and a tight fit. The liner stays inflated while the resin cures.
Curing the Resin Liner
Curing is when the resin hardens and bonds to the pipe wall. This creates the new structural lining. We use one of two methods, hot water or UV light, depending on the pipe size and site conditions.
Hot water curing involves circulating heated water through the inflated liner. The heat accelerates the chemical reaction in the resin, causing it to harden over two to four hours. This method works for most residential and commercial jobs and doesn't require access to both ends of the pipe.
UV light curing uses a UV lamp that's pulled through the liner, curing the resin as it goes. This method is faster, usually taking 30 to 90 minutes, and works well for pipes where we have clear access. The UV light gives us more control over the curing process and allows us to work in tighter timeframes.
Either way, we monitor the temperature and curing process throughout. The resin needs to reach full cure before we move on to the next step, and we don't rush it. A properly cured liner will last 50 years or more.
Final Inspection and Reinstatement
After the liner has fully cured and cooled, we deflate and remove the inflation device. Then we trim the ends of the liner flush with the existing pipe or junction points using a robotic cutter. This gives you a smooth transition with no edges or lips that could catch debris.
Next, we run the CCTV camera through one more time. This final inspection confirms that the liner is seated correctly, fully cured, and free from any defects like wrinkles, voids, or incomplete bonding. We also check that any junctions or side connections have been properly reinstated.
If your pipe had branch lines or side connections that were covered by the liner, we reopen them using a robotic cutter that's guided by the CCTV camera. This restores full flow to all parts of your drainage system without compromising the integrity of the new liner.
We clean up the site, restore any access points we opened, and test the system to make sure everything is flowing properly. Then we hand over copies of the inspection footage and a written report documenting the work.
What This Process Achieves for Your Property
Pipe relining creates a new pipe inside your old one without digging up your property. The new liner is structurally sound, corrosion-resistant, and root-proof. It restores full flow capacity and eliminates the leak or blockage that was causing problems.
For property owners in Sydney, particularly in older suburbs like Earlwood, Summer Hill, and Manly where aging infrastructure is common, this process saves time, money, and disruption. No trenches. No destroyed gardens or driveways. No weeks of construction mess.
The work typically takes one to two days depending on the length and complexity of the job. Your plumbing is back in service as soon as the liner is cured and tested. We've refined this process to work efficiently in all kinds of site conditions, from tight inner-city backyards in Alexandria to sprawling properties in Roseville.
If you're dealing with damaged pipes and want to avoid a major dig-up job, this is how we fix them. We've done this process hundreds of times across Sydney, and it works. No digging. No guesswork. Just a solid, long-lasting repair that gets your plumbing back to normal. If you'd like to know whether pipe relining is right for your situation, get in touch with us and we'll talk you through your options.
Frequently Asked Questions
How long does the pipe relining process take from start to finish?
Most residential pipe relining jobs take one to two days. The inspection and cleaning usually happen on day one. The liner installation and curing happen on day two. Larger or more complex jobs might take longer, but we'll give you a clear timeframe after the initial inspection.
Can you reline pipes in any weather conditions?
Yes, in most cases. Because pipe relining happens inside the existing pipe, weather doesn't usually affect the process. Heavy rain can sometimes delay access or inspection work, but the relining itself can proceed regardless of conditions outside.
Will pipe relining reduce the diameter of my drain?
Only slightly. The liner typically reduces the internal diameter by 3 to 6 millimetres depending on the pipe size. The new liner creates a smoother interior surface that actually improves flow compared to old, rough, or damaged pipes.
Do you need to dig up my property to access the pipes?
Usually not. We access pipes through existing entry points like inspection shafts, gully traps, or cleanouts. In rare cases where there's no suitable access point, we might need to create one, but this involves a small excavation rather than digging up the entire pipe run.
How long will a relined pipe last?
A properly installed pipe liner has a lifespan of 50 years or more. The epoxy resin we use is highly durable, resistant to corrosion, and immune to tree root intrusion. It's a long-term fix, not a temporary patch.

Andy Quinn
Founder
Andy Quinn is the founder of Sewer Surgeon, a family-owned plumbing business serving Sydney with over 63 years of combined industry expertise. Andy and his team specialize in delivering reliable solutions for everything from blocked drains to emergency plumbing, ensuring quality service and customer satisfaction.


.png)


.png)


